Modeling Ideas and Information
Mortar and Mullions – What To Do?
As a model railroad hobbyist, I was never satisfied using washers, paints and other methods to simulate mortar joints on brick buildings. No matter what method I used or saw never really defined the difference between the brick and mortar in a way that represents a life like appearance.
A friend of mine recently mentioned he used DAP® Fast’N Final Lightweight Spackling to simulate concrete walkways and roads. I tried this and it worked great.
I decided to use the same material to simulate mortar and I was very pleased with the results. The material is so simple to use I just rubbed it on the bricks with my thumb which filled in the relief nicely and gave a great representation how mortar should look. I continued to rub the bricks with my thumb removed the excess from the brick surface.

Recently, I purchased Walthers Cornerstone Machine Shop (https://www.walthers.com/exec/productinfo/933-2902) – low and behold the window panes and mullions were molded into one piece. Now what? How do I paint the mullions and keep the panes clear? I came up with a method first spraying this item with Dull Cote on both sides. Next I took a black Sharpie and painted the mullions. Then I applied the window panes to the building. The overall result was very pleasing and gave me the results I was looking for.


Cheap Talk
Pete LaGuardia and Mat Thompson both have layouts set in the 1950s. They conduct operating sessions using Time Table and Train Order procedures. On the prototype, telephones were the communications mode. On their layouts, they unhappily substituted Family Series Radios (FRS) for telephones.
FRS radios are cheap and easily available, but they have several shortcomings. They broadcast to everybody including those without a radio or any interest in the conversation. Simple as they are, there are many variations making them difficult to use. Headsets are uncomfortable and push-to-talk microphones are awkward.
Both Pete and Mat operate on a few railroads that have resurrected phones from the 50s and earlier. They are fun to use, but a prototypical system can cost several hundred dollars. Finding, repairing and installing equipment can be interesting but is also time consuming and complex.
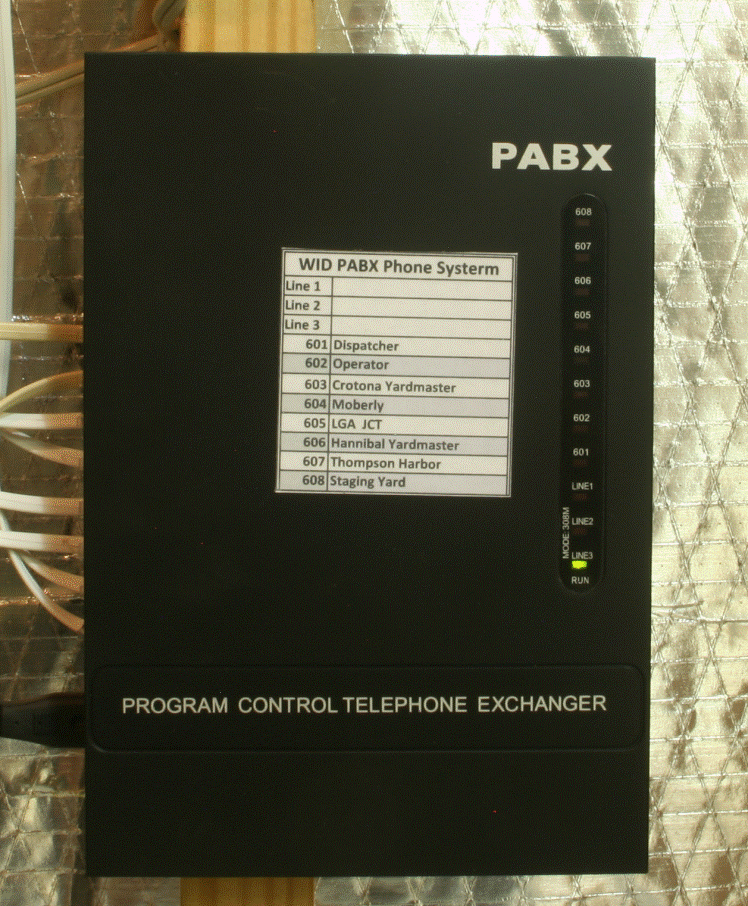
Then Mat visited Mike Kipps in Williamsburg, VA. While showing Mat his Reading Railroad, Mike pointed to the dispatcher’s work area and said “That’s my phone system.” He said it was a PABX (Private Automated Branch Exchange) he bought on eBay for $20, along with several $5.95 telephones from Walmart. Telephone cable connects the phones to the PABX, and the PABX is plugged into a wall outlet to power the whole system.
Pete and Mat discussed this find, astounded to find a simple, cheap way to move from the FRS radios to telephones. They both talked to Mike again and Pete did some research. All looked good. Pete couldn’t find a PABX for $20, but did find one on eBay for $50, including shipping from China.
When it arrived a few weeks later, he plugged the PABX into an electrical outlet, plugged two telephones into the PABX and dialed. It worked perfectly. Pete got more phones, ran phone cable under his layout and soon had a full system working. Since then, Mat has done the same. The heart of the system is a PABX or PBX (about the size of a book) rated at 110 Volts AC. They are sold in 1x8, 2x8 or 3x8 configurations. The first number is outside lines, sometimes called COTS (Central Office Telephone System) which you don’t care about for use with your railroad. The second number is intercom connections. Since you are only using the intercom function, this is the part important to you. The intercom lines have predetermined three-digit numbers from 601 to 608. The first jack is 601, the second 602, and so on.
PABXs are available on eBay. As of March 2014, the Mini PABX Analog Telephone Exchange with 3 Lines and 8 Extensions PABX system costs $65 with free shipping, or $45 dollars and $20 dollars shipping from China. Similar devices are available from Amazon but at much higher prices. There is no way to tie PABXs together to get more than eight phones on the system. If you just have to have more than eight phones, you might consider getting two systems and giving the dispatcher two phones. The drawback would be that someone on one system can’t call someone on the other. Another option is to consider how you place the phone. A yardmaster may need a dedicated number because he has incoming and outgoing traffic. But when an engineer calls the yard for permission to enter, he can use any phone (except the number he is calling) because he doesn’t get incoming calls.
You can also buy bigger systems such as 4x16 and 4x32. These are sophisticated office phone systems that cost several hundred dollars. For Pete and Mat they far exceeded their need and pocketbook, so they didn’t research them.
Here’s what it takes:
-
A 110 Volt AC PABX (Be careful - 220 Volt PABXs are also made.)
-
1 to 8 analog corded telephones (widely available at $6 to $15). Analog speakerphones (for the dispatcher) can be found in the $20-30 range.

No Flicker LED Lighting for you Passenger Cars

There is nothing more impressive to see your favorite Passenger Cars operating on your layout with lighting interiors. However do to dead spots or dirty track the light will flicker. This takes away the effect you are trying to achieve and making it unacceptable.
With the continuing reducing of the size of LED and Capacities, you now have the ability to eliminate the flicker for under the cost of $4.00. I decided to use a 12” 14V LED Strip “Warm White” which give me the effect of incandescent lamp You can choose are different temperatures if you like to simulate fluorescent lighting.
I have also added a Mini adjustable power supply so you can adjust the brightness of the LEDs.
Finally we add a capacitor to achieve the “No Flicker Affect”.
If you do not have Walthers Passenger Cars you can buy the wheel wipers from Streamlined Backshop http://sbs4dcc.com/home.html

Below is the BOM
1 EACH:
LED 12” Strips Warm White. A 5 pack price $8.10 or $1.62 each. I remove 3” of the LED to fit in Passenger Car. The 3” (3 LED) strip I removed, can be used for other application on you Railroad. Below is where you can purchase the LED Strips
Jerome Smigia
24647 S. Stoney Island Ave.
Crete, IL 60417 USA
1 EACH:
Diode Bridge Digi-Key P/N DF06M-ND Price .41 each
1 EACH:
Capacitor Digi-Key P/N 493-135-ND Price .51 each
1 EACH:
Mini 3A DC-DC Converter Adjustable Step down Power Supply Module replaces LM2596s for .75 each on eBay.
Below is the wiring diagram.

Tortoise Edge Connectors
The Perfect Match
As long as I can remember Circuitron tortoise has been the defacto standard for operating turnouts.
The problem with the tortoise edge connector, the board does not use an industry standard spacing, and off-the-shelf PCB edge connectors won’t work. For many years EDAC Inc P/N EDC305200-ND has been the default used. The problem with this connector is it employs 10 contacts where the tortoise only has 8.

To solve the problem with the EDAC connector, you can add the polarizing key from EDAC P/N 338-240-328.

Recently, there’s been a lot of advertisements for a blue connector which uses 8 contacts but also has similar problems using it with the tortoise.

Both connectors do not match the tortoise contacts exactly due to the spacing on the tortoise edge connector.
The connector from Kobiconn P/N 158-P02EK381V8-E 90 degree Connector, is actually a "Perfect Match" for the tortoise and eliminates the problem from the above two connectors at a price of $2.33 each, 50 each @ $1.95.

Small Heading
You will also notice, Tortoise's Snail, which has an on board DCC decoder, uses Kobiconn connector.

For new construction, you will be able to solder the Kobiconn connector on the Tortoise at your workbench and the connector employs screw terminals for adding wires.

For existing construction, obviously the green and blue connector is a lot easier to install as long as you provide some method to keep the connector in line with the Tortoise contacts on the PC board.
http://www.mouser.com/ProductDetail/Kobiconn/158-P02EK381V8-E/?qs=0%252bTA0qr8p3oLtResHOic8g%3D%3D
Hard to Find Hardware
Tired of looking for hard to find hardware and when you do so you have to pay a high price. Micro Fasteners offers a solution for your needs. They offer a large assortment of hardware fasteners and drill bits that will meet your needs. The unit price is extremely reasonable although shipping is a minimum of $8. I have used them in the past and found their products and service highly acceptable . I especially use their Pan Head Sheet Metal Screw PN SMPP0204 (100 pieces for $2.75) for attaching trucks to the under body of my rolling stock. This screw is a lot better than the ones provided and is a self tapping screw which secures the truck better than the original manufacturer. If you have experiences the loss of the pins from some manufacturer provide for securing the truck you’ll find this alternative will eliminate that problem.
Go to their website and you can request a catalog sent to you via email.
Catalog and Price List
Web Page
Track Cleaning
In order to head off a five hour debate on the proper procedure for cleaning our track, I decided to get information from Atlas.
Here are my findings:
Atlas nickel silver track in actually made up of brass and nickel, there is no silver used in the track what so ever. Please note that nickel and brass are poor conductors of electricity. That said, the reason Atlas went to this compound was the fact that oxidation on brass track is an insulator whereas oxidation under nickel is actually a conductor. The technician at Atlas further stated as the track tarnishes, you're actually seeing a form of oxidation. It is not dirt.
The problem arises from airborne contamination which lays on the track and picked up by the wheels of our rolling stock. This is where the problem lies. They recommend a chemical to clean the track. This chemical should evaporate and evaporation actually should remove any contaminates on the track. It's their opinion that the most important way to improve electrical contact between the rails and the engine wheels is to keep the wheels clean. They suggest that our members should before and after any shows clean the engine wheels.
When you see black spots on the rail, it's from using a chemical that leaves a residue on the rail that is picked up by the wheels and then transformed back to the track. Those black spots can be removed with a whipping of a chemical such as alcohol. They suggested to take the Goo Gone and put it in the trash. In their opinion Goo Gone contributes to the black spots of dirt we see on our rails.
Metal wheel sets, according to Atlas, has no effect one way or the other on approving the electrical properties of the rails. However, they are less likely to pick up dirt from the track and transfer it back to the rails.
Further research shows that the Aero-Car Technology co. actually make a chemical recommended by DCC MFR to improve the electrical properties between the rails and the wheels (ACT-6006). This chemical actually leaves a conductive coating on the rails or wheels depending on how you use it. They recommend it is whipped on before each show. This item is expensive and we should discuss as a group. Cautions should be used when applying this chemical over the turnouts as a short can occur. That is why they recommend applying it to the wheels or the engine.
Below is the information to contact Aero-Car Technology and Atlas.
Aero-Car Technology
P.O. Box 336, Western Springs
IL 60558-0336
703-246-9027 Phone
703-246-7648 Fax
Atlas Model Railroad Co. Inc.
378 Florence Ave
Hillside, NY 07205
908-678-0880 Phone
I am also using Sandflex blocks work just like the erasers we all grew up with. Just rub the block on the rails and it will be erased all dirt and crud that is picked up by wheels and spread around the layout. I feel the abrasive blocks from Walthers or Peco leave tiny scratches in the rail head that attract dirt.
These blocks will last for years and do not confuse these with the standard sanding blocks you can buy in the store. These have abrasive material through the whole block. I use the Fine one and below is a link for more info.

